

guide_create_widget - How to create a widget
In this tutorial, we show you how to create a simple widget but keep in mind that modules can contain any kind of component (forms, templates, resources, etc ...).
To create a module in Extenso, access the menu:
Dev. Site -> Modules
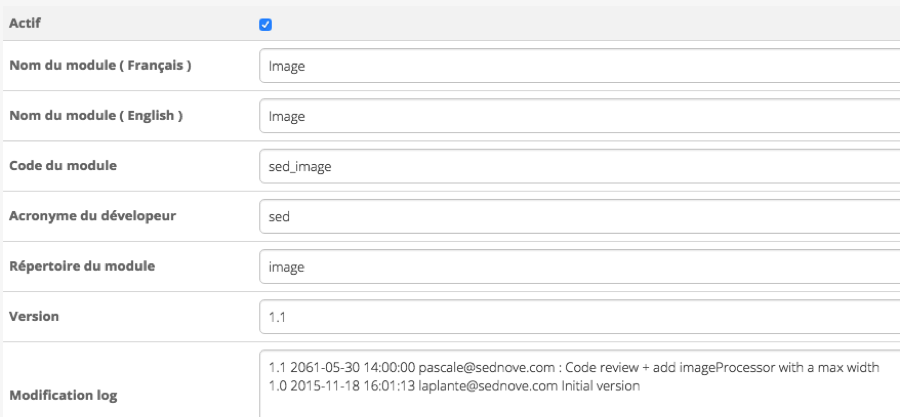
Here are the values for a module that will contain an image widget:
The module code will be sed_image
Developer acronym: sed
Module directory: image
Version: number of the latest version
Log modification: will contain the changes
The functionality book should include all the functionality of the module widgets.
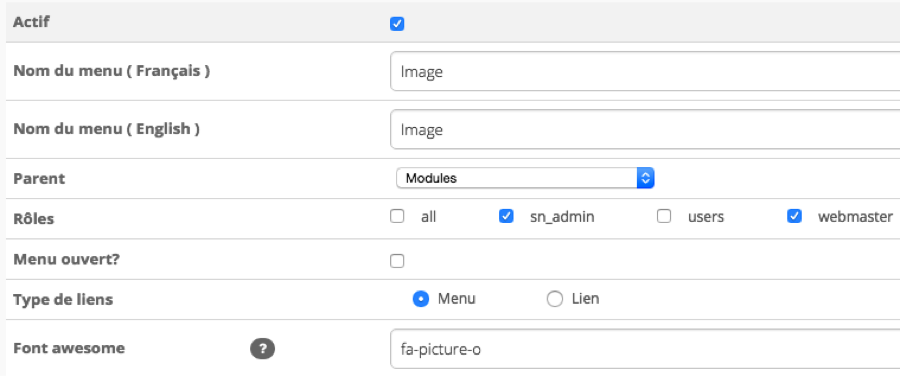
Extenso -> Configuration -> Left menu
Associate this menu with the parent menu "Modules"
Refresh the page to see your module appear.
Extenso -> Database -> List of tables
The name of the tables associated with the widget must begin with the name of the developer.
Example if the developer is sed, the table will be called sed_image.
The fields of the table must be documented for the lambda user.
.

La table doit être associée à son module.

Rafraichir la page pour voir apparaitre votre table dans le menu Modules.
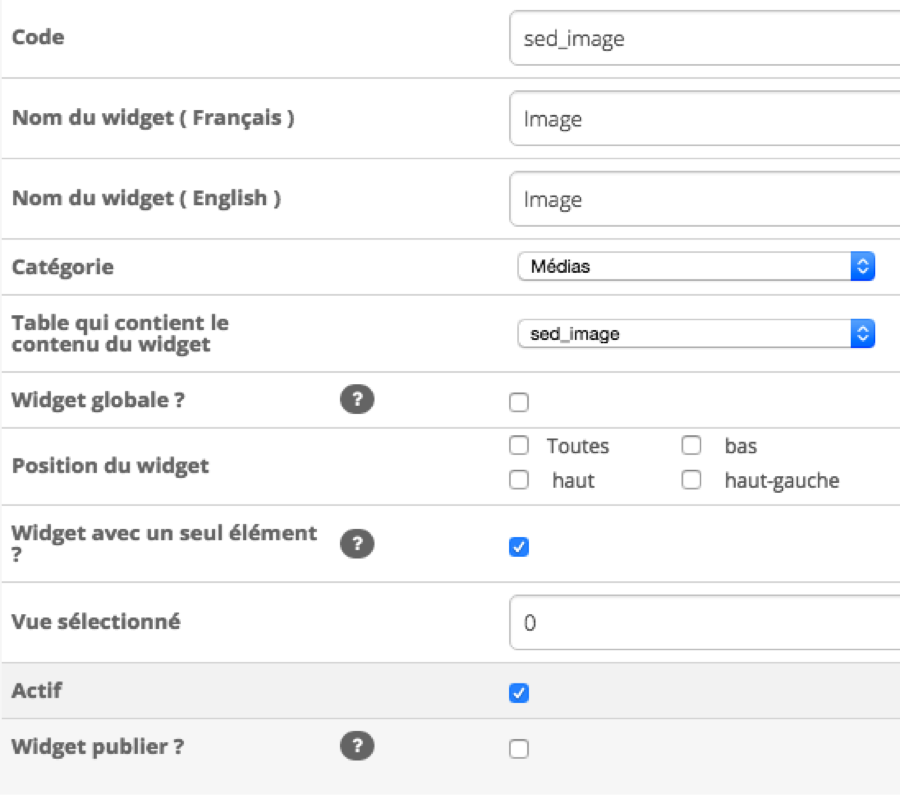
In Extenso: Widgets -> Configuration -> Widgets
The widget code must start with the name of the developer (/ module / developer / module directory / widget):
/module/sed/image/widget/sed_image.sn
The widget must be associated with its module. Exemple : sed_image

Widget code must start with a header :
Put comments in the code
Cts must have a name that begins with the name of the programmer and must be associated with their module
Exemple :
You have to add a description and put an image of the widget.
As soon as your widget contains content from a table, you must provide default values.
For example, if you create a widget that displays the list of employees with their photo, you must provide a default image if the employee has not yet uploaded an image.
They should be placed in the module folder.
Exemples :
/module/sed/contact/image/sed_photo.png
/module/sed/contact/email/sed_contact_form_email.sn
/module/sed/contact/ressource/sed_contact_form.sn
You must set the class "<name_of_widget>" and the ID "<name_of_widget>_<uid_instance_of_widget>"
Update the version.sn file located at the root of the site then publish the fullpage page located in the left menu Extenso -> Database -> Extenso Pages
Refresh the page and click on the version number at the bottom of the Extenso menu.
{ "date" : "2016-05-30", "author": "pascale@sednove.com", "comment" : "Change name", "files" : ["/module/sed/image/widget/sed_image.sn"] },
If there are multiple files
{ "date" : "2016-04-04", "author": "laplante@sednove.com", "comment" : "Specify sqlqm in publish of stored procedure and triggers", "files" : ["extenso/publish/sn_stored_procedures.sn","extenso/publish/sn_triggers.sn"] },
Make a commit of all the files of the module.
Written by Pascale Dewingaerde, <pascale@sednove.com>
Edit